

Funcraft是一个支持阿里云Serverless应用部署的工具,通过配置template.yml文件来协助进行开发、构建、部署等操作
安装
fun
建议使用npm进行安装,其他安装方式
npm install @alicloud/fun -g
# 查看版本
fun --versiondocker
配置
1 .env文件
在template.yml文件所在目录,新建.env文件
ACCOUNT_ID=xxxxxxxx
REGION=cn-shanghai
ACCESS_KEY_ID=xxxxxxxxxxxx
ACCESS_KEY_SECRET=xxxxxxxxxx
FC_ENDPOINT=https://{accountid}.{region}.fc.aliyuncs.com
TIMEOUT=10
RETRIES=32 fun config命令
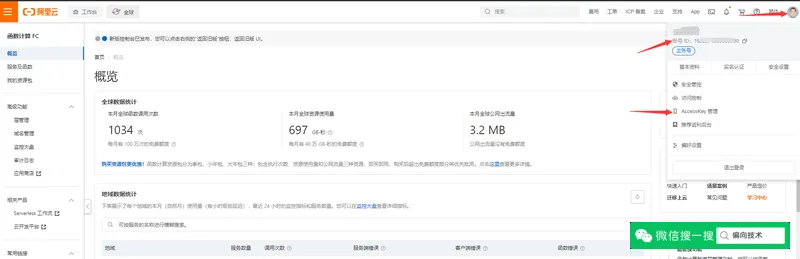
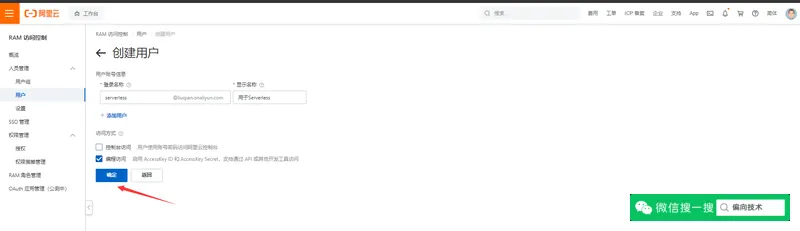
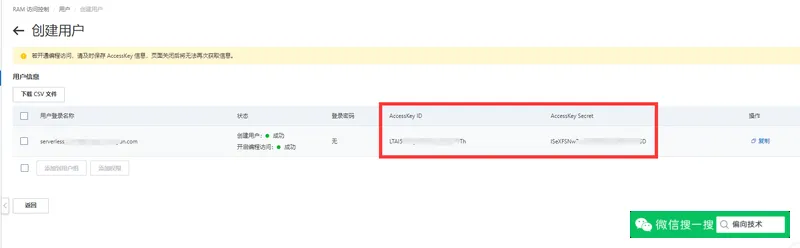
通过执行fun config命令,依次配置Account ID、AccessKey ID、AccessKey Secret、Default Region Name等参数,其中Account ID就是账号ID,AccessKey ID可以在函数计算控制台右上角的AccessKey 管理 - 开始使用子用户AccessKey - 创建用户,创建成功后,可以看到AccessKey ID和AccessKey Secret,离开页面后AccessKey Secret将不可见,所以务必在离开时进行复制,Default Region Name可以参考Region List,如下图所示。
3 通过环境变量配置
针对不同的平台,通过环境变量配置Funcraft的步骤不同,通过环境变量进行配置时,可选配置项与.env相同
命令说明
> fun
Usage: fun [options] [command]

The fun command line provides a complete set of commands to define, develop,
test serverless applications locally, and deploy them to the Alibaba Cloud.

Options:
  --version       output the version number
  -v, --verbose   verbose output
  -h, --help      display help for command

Commands:
  config          Configure the fun
  init            Initialize a new fun project
  install         Install dependencies which are described in fun.yml
  build           Build the dependencies
  local           Run your serverless application locally
  edge            Run your serverless application at edge
  validate        Validate a fun template
  deploy          Deploy a fun application
  nas             Operate NAS file system
  package         Package a Function Compute application
  invoke          Remote invoke function
help [command] display help for commandinit
❯ fun init --help
Usage: fun init [options] [template]

Initialize a new project based on a template. A template can be a folder containing template metadata and boilerplate files, a name of a pre-built template, or a url that resolves to a template. You can find more information about template at https://yq.aliyun.com/articles/674364.

Options:
  -o, --output-dir [path]  Where to output the initialized app into (default: ".")
  -n, --name [name]        The name of your project to be generated as a folder (default: "")
  -m, --merge [merge]      Merge into the template.[yml|yaml] file if it already exist (default: false)
  --no-input               Disable prompting and accept default values defined template config
  -V, --var [vars]         Template variable
  -h, --help               display help for command

  Examples:

    $ fun init
    $ fun init event-nodejs8
    $ fun init foo/bar
    $ fun init gh:foo/bar
    $ fun init gl:foo/bar
    $ fun init bb:foo/bar
    $ fun init github:foo/bar
    $ fun init gitlab:foo/bar
    $ fun init bitbucket:foo/bar
    $ fun init git+ssh://git@github.com/foo/bar.git
    $ fun init hg+ssh://hg@bitbucket.org/bar/foo
    $ fun init git@github.com:foo/bar.git
    $ fun init https://github.com/foo/bar.git
    $ fun init /path/foo/bar
$ fun init -n fun-app -V foo=bar /path/foo/bar直接使用fun init可以选择默认官方文档,也可直接指定在线模板地址,以express为例如下所示:更多使用方式
fun init -n express-fc https://github.com/awesome-fc/fc-express-nodejs8
# Or
fun init -n express-fc gh:awesome-fc/fc-express-nodejs8install
安装第三方依赖,更多信息查看官方文档
❯ fun install -h
Usage: fun install [-f|--function <[service/]function>] [-r|--runtime <runtime>] [-p|--package-type <type>] [--save] [-e|--env key=val ...] [packageNames...]

install dependencies which are described in fun.yml file.

Options:
  -f, --function <[service/]function>  Specify which function to execute installation task.
  -e, --env <env>                      environment variable, ex. -e PATH=/code/bin (default: [])
  -d, --use-docker                     Use docker container to install function dependencies
  -b, --use-buildkit                   Use buildkit to build functions
  -r, --runtime <runtime>              function runtime, avaliable choice is: nodejs6, nodejs8, nodejs10, nodejs12,
                                       python2.7, python3, java8, java11, php7.2, dotnetcore2.1, custom,
                                       custom-container
  -p, --package-type <type>            avaliable package type option: pip, apt, npm.
  --save                               add task to fun.yml file.
  --registry <npm-url>                 Configure npm to use any compatible registry, and even run your own registry.
  --index-url <pip-url>                Base URL of Python Package Index (default https://pypi.org/simple). This should point to a repository compliant with PEP 503 (the simple repository API) or a local
                                       directory laid out in the same format.
  -h, --help                           display help for command

Commands:
  init                                 initialize fun.yml file.
  env                                  print environment varables.
sbox [options] Start a local sandbox for installation dependencies or configuration如果存在Funfile文件,将会按照Funfile文件中的步骤依次执行命令
❯ fun install
using template: template.yml
start installing function dependencies without docker

building custom-fastify/custom-fastify
Funfile exist, Fun will use container to build forcely
Step 1/3 : FROM registry.cn-beijing.aliyuncs.com/aliyunfc/runtime-custom:build-1.9.17 as custom
 ---> e6282033ae8d
Step 2/3 : COPY ./package.json .
 ---> Using cache
 ---> d7ec10d6d715
Step 3/3 : RUN npm install
 ---> Using cache
 ---> b3e13efbe135
sha256:*******************************************local
需要开启docker服务
❯ fun local --help
Usage: fun local [options] [command]

Run your serverless application locally for quick development & testing.

Options:
  -h, --help      display help for command

Commands:
  invoke          Invoke a function locally once
  start           Runs your HttpTriggers and APIs locally
help [command] display help for commandbuild
将源码构建成交付产物,构建过程中会优先执行Funfile文件中的步骤,构建完成后,将会在根目录下创建一个.fun文件夹,更多信息请访问官方文档,我们可以通过Funfile结合.funignore来指定要提交到函数计算的文件以及如何编译,例如:(将一个typescript项目进行打包部署)
.funignore
# Funcraft
template.yml
.env
.fun
src
test
.vscode
.idea
node_modulesFunfile
复制package.json,接着执行依赖安装npm install,复制src目录和tsconfig.json文件,接着执行build命令
RUNTIME custom
COPY ./package.json .
RUN npm install
COPY ./src ./src
COPY ./tsconfig.json .
RUN npm run buildbootstrap
该文件用于指明函数计算中函数的入口如何执行
#!/usr/bin/env bash
export PORT=9000
npm run startdeploy
fun deploy将会将build构建后的代码.fun/build/artifacts/{projectName}/{projectName}下的内容部署到阿里云函数计算,更多内容
❯ fun deploy
using template: .fun\build\artifacts\template.yml
(node:112168) Warning: Accessing non-existent property 'validateParameters' of module exports inside circular dependency
(Use `node --trace-warnings ...` to show where the warning was created)
using region: cn-shanghai
using accountId: ***********9600
using accessKeyId: ***********GHex
using timeout: 120

Collecting your services information, in order to caculate devlopment changes...

Resources Changes(Beta version! Only FC resources changes will be displayed):

┌────────────────┬──────────────────────────────┬────────┬─────────────┐
│ Resource       │ ResourceType                 │ Action │ Property    │
├────────────────┼──────────────────────────────┼────────┼─────────────┤
│ custom-fastify │ Aliyun::Serverless::Service  │ Add    │ Description │
├────────────────┼──────────────────────────────┼────────┼─────────────┤
│                │                              │        │ Handler     │
│                │                              │        ├─────────────┤
│                │                              │        │ Runtime     │
│ custom-fastify │ Aliyun::Serverless::Function │ Add    ├─────────────┤
│                │                              │        │ MemorySize  │
│                │                              │        ├─────────────┤
│                │                              │        │ CodeUri     │
├────────────────┼──────────────────────────────┼────────┼─────────────┤
│                │                              │        │ AuthType    │
│ httpTrigger    │ HTTP                         │ Add    ├─────────────┤
│                │                              │        │ Methods     │
└────────────────┴──────────────────────────────┴────────┴─────────────┘

? Please confirm to continue. (Y/n)相关文件
主要又template.yml、Funfile、.funignore、bootstrap、.env文件
template.yml
用来描述serverless应用,具体内容请访问template.yml
Funfile
使用Funfile文件安装第三方依赖(推荐),Dockerfile支持的命令,例如COPY、RUN、ENV、USER和WORKDIR等,Funfile也同样支持,通过Funfile我们可以进行依赖安装、项目测试、项目打包等一系列操作,Funfile会影响fun install和fun build命令,更多内容请访问官方文档,例如:
RUNTIME custom
COPY ./package.json .
RUN npm install.funignore
在 template.yml 所在的目录放置一个 .funignore 文件,打包 zip 文件的时候可以排除掉 .funignore 内描述的文件或者文件夹。.funignore会影响fun build命令,例如:
# Logs
logs/
*.log

# Dependency directories
node_modules/
!bb/node_modules打包时会忽略 logs/ 目录 、*.log 文件。所有层级的 node_modules/ 目录会被忽略,但是 bb/node_modules 会被保留。.funignore 遵从 .gitignore 的语法。
bootstrap
使用Custom Runtime运行环境时,会默认调用bootstrap文件启动自定义的HTTP Server,更多内容请访问bootstrap,例如:
#!/usr/bin/env bash
export PORT=9000
npm run start.env
ACCOUNT_ID=xxxxxxxx
REGION=cn-shanghai
ACCESS_KEY_ID=xxxxxxxxxxxx
ACCESS_KEY_SECRET=xxxxxxxxxx
FC_ENDPOINT=https://{accountid}.{region}.fc.aliyuncs.com
TIMEOUT=10
RETRIES=3
评论 (0)