通过多个 docker-compose.yml 部署多个网站,nginx 代理转发不同的网站到80端口,不同域名访问不同的网站,docker-compose 管理单个网站的多个服务
缘由
最近,由于函数计算上的前端服务访问所需的冷启动时间略长,所以尝试将服务迁移到自己的服务器上,但是,原本服务器上部署了一个内网穿透的静态页面,且还是 Windows server,所以,如果要真正当作线上生产服务器,还是得用 Linux 系统舒服,用 docker 来部署网站,docker-compose 来管理单个网站,这样就很方便了。
一、利用公共nginx-proxy,需开放端口
这里假设已经安装好 docker 和 docker-compose,使用轻量版 nginx:stable-alpine 镜像以减小容器大小
以下用示例说明,下面说的服务等同于容器
假设有网站 A、B、C,网站 A 的 nginx1 服务对外暴露出8080端口,网站 B 的 nginx2 服务对外暴露出8081端口,网站 C 的 nginx3 服务对外暴露出8082端口,此外,我们还需要一个公用的 nginx-proxy 服务来代理转发网站 A 的8080端口、网站 B 的8081端口、网站 C 的8082端口到80端口,服务器上的所有网站都通过 nginx-proxy 服务暴露给外网访问,这样通过不同的 server_name 就能访问到对应的网站。
需要注意的是 nginx 服务对外暴露的端口需要在服务器 - 安全组中放开
nginx-proxy
公用 nginx 代理转发服务,切记 proxy_pass 里的地址需要在外网能够正常访问,即示例中的8080和8081端口需要在服务器安全组中添加例外
# docker-compose.yml
version: "3"
services:
  test-nginx-proxy:
    image: nginx:stable-alpine
    container_name: test-nginx-proxy
    restart: always
    ports:
      - 80:80
    volumes:
- ./nginx.conf:/etc/nginx/nginx.conf# nginx.conf
http {
# ……
server {
listen 80;
server_name www.example_1.com;
location / {
proxy_pass http://<服务器 IP 地址>:8080;
}
}
server {
listen 80;
server_name www.example_2.com;
location / {
proxy_pass http://<服务器 IP 地址>:8081;
}
}
server {
listen 80;
server_name www.example_3.com;
location / {
proxy_pass http://<服务器 IP 地址>:8082;
}
}
}
nginx1
# docker-compose.yml
version: "3"
services:
  test-nginx1:
    image: nginx:stable-alpine
    container_name: test-nginx1
    restart: always
    ports:
      - 8080:80
    volumes:
      - ./:/usr/share/nginx/html
- ./nginx.conf:/etc/nginx/nginx.conf# nginx.conf
http {
# ……
server {
listen 80;
server_name localhost;
location / {
root /usr/share/nginx/html;
index index.html;
}
}
}<!DOCTYPE html>
<html lang="en">
<head>
<meta charset="UTF-8">
<meta http-equiv="X-UA-Compatible" content="IE=edge">
<meta name="viewport" content="width=device-width, initial-scale=1.0">
<title>Document</title>
</head>
<body>
测试页面 - nginx1
</body>
</html>nginx2
# docker-compose.yml
version: "3"
services:
  test-nginx2:
    image: nginx:stable-alpine
    container_name: test-nginx2
    restart: always
    ports:
      - 8081:80
    volumes:
      - ./:/usr/share/nginx/html
- ./nginx.conf:/etc/nginx/nginx.conf# nginx.conf
http {
# ……
server {
listen 80;
server_name localhost;
location / {
root /usr/share/nginx/html;
index index.html;
}
}
}<!DOCTYPE html>
<html lang="en">
<head>
<meta charset="UTF-8">
<meta http-equiv="X-UA-Compatible" content="IE=edge">
<meta name="viewport" content="width=device-width, initial-scale=1.0">
<title>Document</title>
</head>
<body>
测试页面 - nginx2
</body>
</html>nginx3
网站 C 不是静态页面,而是 web 服务,那就需要将 web 服务暴露出的9000端口转发至 nginx3 服务的8082端口,在同一个 docker-compose.yml 中的服务,可以通过名称直接访问另一个服务
# docker-compose.yml
version: '3'
services:
  test-nginx3:
    image: nginx:stable-alpine
    container_name: test-nginx3
    restart: always
    ports:
      - 8082:80
    volumes:
      - ./nginx.conf:/etc/nginx/nginx.conf
  web:
    container_name: web
    restart: always
    build: .
    ports:
- 9000:9000# nginx.conf
http {
# ……
server {
listen 80;
server_name localhost;
location / {
proxy_pass http://web:9000;
}
}
}二、利用公共nginx-proxy和docker-compose之间通信
利用 docker-compose 之间的通信,可以减少端口的暴露,一定程度上保护网站的安全,但实际上,多网站服务下总会有额外的端口暴露需求,所以,可以结合上一个方案,一起使用
nginx-proxy
先利用 docker 创建一个网络nginx-proxy,用于 docker-compose 下的 nginx 服务之间进行通信
docker network create nginx-proxy接着修改公共 nginx-proxy 的 docker-compose.yml 文件,添加 nginx-proxy 网络
# docker-compose.yml
version: "3"
services:
  nginx-basic:
    image: nginx:stable-alpine
    restart: always
    ports:
      - "80:80"
      - "443:443"
    volumes:
      - ./nginx.conf:/etc/nginx/nginx.conf
      - ./certs:/etc/nginx/certs
networks:
  default:
name: nginx-proxy# nginx.conf
http {
# ……
server {
listen 80;
server_name www.example_1.com;
location / {
proxy_pass http://test-nginx1:8080;
}
}
server {
listen 80;
server_name www.example_2.com;
location / {
proxy_pass http://test-nginx2:8081;
}
}
server {
listen 80;
server_name www.example_3.com;
location / {
proxy_pass http://test-nginx3:8082;
}
}
}nginx1
# docker-compose.yml
version: "3"
services:
  test-nginx1:
    image: nginx:stable-alpine
    container_name: test-nginx1
    restart: always
    ports:
      - 8080:80
    volumes:
      - ./:/usr/share/nginx/html
      - ./nginx.conf:/etc/nginx/nginx.conf
    networks:
      - proxy
networks:
  proxy:
    external:
name: nginx-proxynginx.conf 无需修改,nginx2 和 nginx3 按照 nginx1 一样设置 networks
三、利用nginxproxy/nginx-proxy镜像和CDN加速
通过 nginxproxy/nginx-proxy 镜像,可以实现非常简单的服务代理,通过CDN加速配置,可以实现更多的控制
下面配置中whoami服务暴露出8000端口,该服务外网不可访问,通过nginx-proxy代理到8080端口,同时开放给外网访问
# docker-compose.yml
version: '3'

services:
  nginx-proxy:
    image: nginxproxy/nginx-proxy
    ports:
      - "8080:80"
    volumes:
      - /var/run/docker.sock:/tmp/docker.sock:ro

  whoami:
    image: jwilder/whoami
    expose:
      - "8000"
    environment:
      - VIRTUAL_HOST=demo.bilishare.com
- VIRTUAL_PORT=8000假设服务器IP地址为1.2.3.4
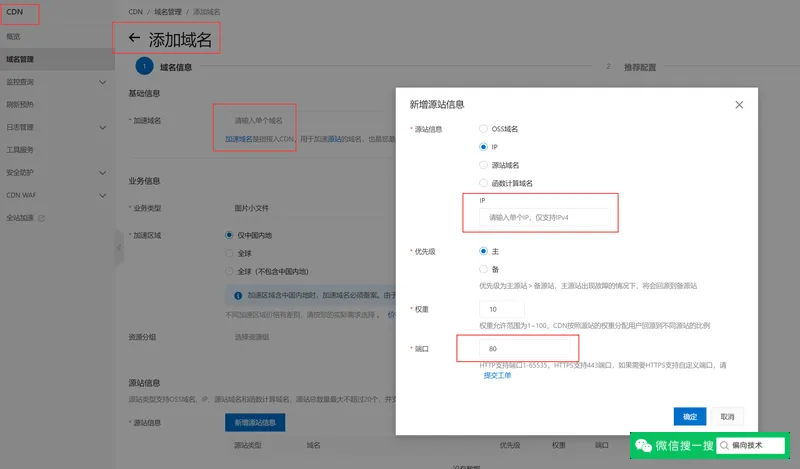
以阿里云CDN为例,在控制台添加域名处,输入加速域名为demo.bilishare.com,IP为1.2.3.4,端口为8080,确认后,在域名解析添加一条CNAME解析记录,稍微等待一两分钟,我们就能通过域名demo.bilishare.com访问了

配置过程需要稍微等待一段时间


结果
文件夹目录如下
D:.
├───nginx-proxy
├───nginx1
└───nginx2在不同的文件夹下执行 docker-compose up 命令来启动所有的服务,这里只是模拟最简单的静态页面。
❯ docker ps -a
CONTAINER ID   IMAGE                 COMMAND                  CREATED             STATUS             PORTS                      NAMES
4cb0af346beb   nginx:stable-alpine   "/docker-entrypoint.…"   About an hour ago   Up About an hour   0.0.0.0:80->801/tcp   test-nginx-proxy
747e3257079b   nginx:stable-alpine   "/docker-entrypoint.…"   About an hour ago   Up About an hour   0.0.0.0:8081->80/tcp       test-nginx2
c5d78255728e nginx:stable-alpine "/docker-entrypoint.…" About an hour ago Up About an hour 0.0.0.0:8080->80/tcp test-nginx1总结
通过将网站容器化,不仅方便了部署,保证了生产环境的一致性,而且在将来需要迁移时,也能够快速进行重新部署。
多网站部署网上有很多方案,也有很多的管理工具,不一定局限于使用 docker。


评论 (0)