

最近因为使用 ChatGPT 需要在本地以系统代理模式一直科学上网,这会使 WSL2 中的 vscode 在打开项目时遇到 Windows 的代理的问题,问题的根源是 Windows 主机上的代理地址为 127.0.0.1:7890,而这个地址在 WSL2 中是不存在的,这就会导致在 WSL2 中所有主动使用代理的请求都会报错,而那些没有使用代理的地址是无法访问的状态
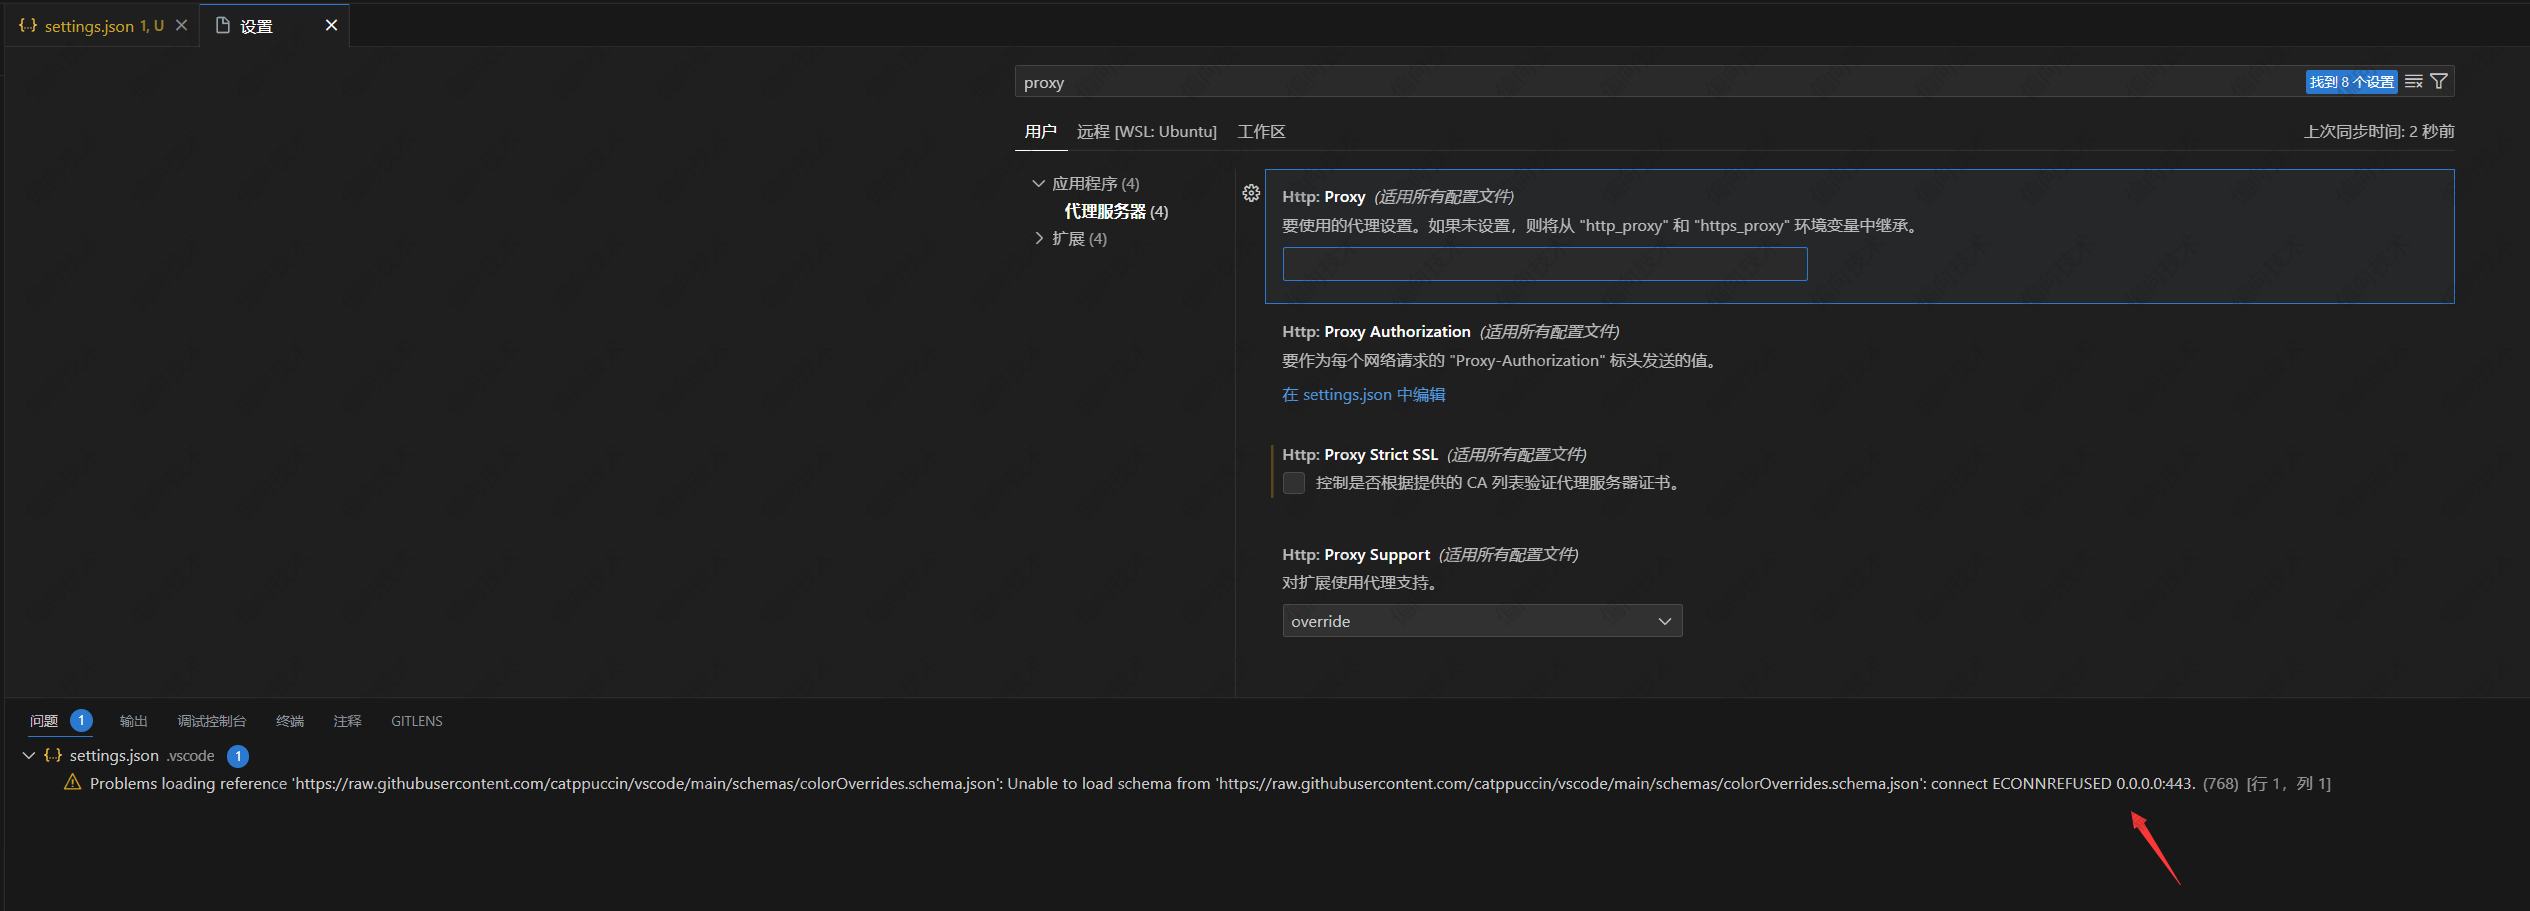
Problems loading reference 'https://raw.githubusercontent.com/xxxxxx': Unable to load schema from 'https://raw.githubusercontent.com/xxxxxx': Failed to establish a socket connection to proxies: ["PROXY 127.0.0.1:7890"]上面这个问题出现在 .vscode/settings.json 文件中,这个问题和 vscode 设置有关,后面再说
解决方案
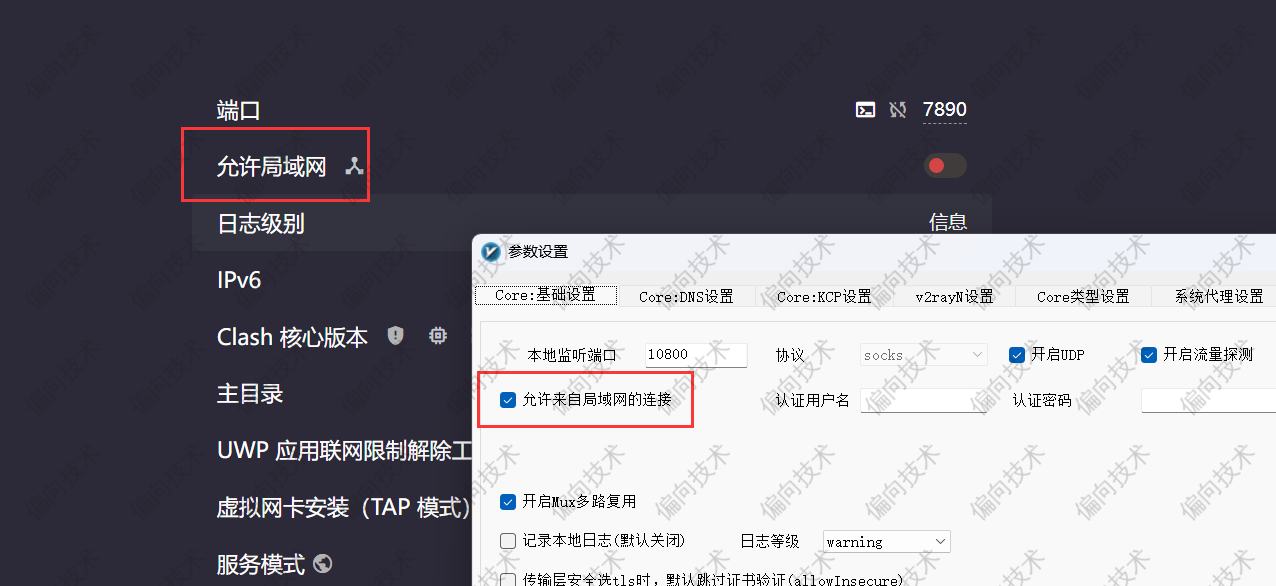
开启允许局域网连接
首先在使用的科学上网工具客户端中开启允许局域网连接,基本都会有这么一个选项,找一找
获取 WSL 网卡地址
如果是在 WSL 中,执行下面命令:
cat /etc/resolv.conf | grep -oP '(?<=nameserver\ ).*'
# 输出应该如下
172.28.32.1如果是在 Windows 中
方法一
执行下面命令,找到其中的 "vEthernet (WSL)" 位置,查看 IPv4 地址
# 1.
ipconfig
# 输出如下
Windows IP 配置

xxxxxxx

以太网适配器 vEthernet (WSL):

   连接特定的 DNS 后缀 . . . . . . . :
   本地链接 IPv6 地址. . . . . . . . : fe80::d8ce:4df6:45a2:89d%30
   IPv4 地址 . . . . . . . . . . . . : 172.28.32.1
   子网掩码  . . . . . . . . . . . . : 255.255.240.0
   IPv4 地址 . . . . . . . . . . . . : 192.168.2.134
   子网掩码  . . . . . . . . . . . . : 255.255.255.0
默认网关. . . . . . . . . . . . . :方法二
下面这个命令应该可以打印出 WSL IPv4 地址
Get-NetIPAddress | Where-Object { $_.InterfaceAlias -like "*WSL*" -and $_.AddressFamily -eq "IPv4" } | Select-Object -ExpandProperty IPAddress设置 WSL 环境变量
在 WSL 中执行下面命令,导出一个环境变量 ALL_PROXY,最好写在 shell 配置文件中,这样下次打开终端时也会存在这个环境变量了
export ALL_PROXY="http://172.28.32.1:7890"PowerShell 脚本
需要开启允许局域网连接,脚本的功能会自动查找当前代理地址,并自动将 导出环境变量 追加到 shell 配置文件,下面是几个可能修改的变量
$distro:对应 WSL 中使用系统的名称,通过 wsl --list --verbose 命令获取
$shell:WSL 中默认使用的 shell 名称,通过 wsl -d Ubuntu bash -c 'basename $SHELL' 获取,Ubuntu 对应上面的 $Distro
$shellProfile:WSL 中默认使用的 shell 配置文件所在的路径
$internetSettingsPath:Internet 选项 在注册表中的位置(无需修改)
function Set-WSLProxy {
  try {
    $distro = "Ubuntu"
    $shell = "zsh"
    $shellProfile = "~/.zshrc"
    $internetSettingsPath = "HKCU:\Software\Microsoft\Windows\CurrentVersion\Internet Settings"

    $currentProxyEnabled = (Get-ItemProperty -Path $internetSettingsPath -Name ProxyEnable).ProxyEnable
    if ($currentProxyEnabled -ne $prevProxyEnabled) {
      if ($currentProxyEnabled -eq 1) {
        # 代理已启用
        Write-Host "代理已启用,执行命令"
        $proxyAddress = (Get-ItemProperty -Path $internetSettingsPath -Name ProxyServer).ProxyServer
        if ([string]::IsNullOrEmpty($proxyAddress)) {
          Write-Host "代理地址未设置,退出执行流程" -ForegroundColor Yellow
          Exit
        }
        else {
          if ($proxyAddress -notlike "http*") {
            # 添加默认的 http:// 前缀
            $proxyAddress = "http://$proxyAddress"
          }
          Write-Host "当前代理地址: $proxyAddress" -ForegroundColor Green
        }

        $ipAddress = (wsl -d $distro --exec cat /etc/resolv.conf | Select-String -Pattern '\b(?:\d{1,3}\.){3}\d{1,3}\b').Matches.Value
        if ([string]::IsNullOrEmpty($ipAddress)) {
          Write-Host "WSL IP 地址未设置,退出执行流程" -ForegroundColor Yellow
          Exit
        }
        else {
          Write-Host "当前 WSL IP 地址: $ipAddress" -ForegroundColor Green
        }

        $proxyUri = New-Object System.Uri($ProxyAddress)
        $newUri = New-Object System.UriBuilder($proxyUri)
        $newUri.Host = $ipAddress

        Write-Host "新的代理地址: $newUri" -ForegroundColor Green
        wsl -d $distro -- $shell -c "sed -i '/export ALL_PROXY/d' $shellProfile && echo `"export ALL_PROXY=$newUri`" >> $shellProfile && source $shellProfile"
        Write-Host "WSL 代理地址已设置" -ForegroundColor Green
      }
      else {
        # 代理已禁用
        Write-Host "代理已禁用,执行命令"
        wsl -d $distro -- $shell -c "sed -i '/export ALL_PROXY/d' $shellProfile && source $shellProfile"
        Write-Host "WSL 代理地址已设置为空" -ForegroundColor Green
      }
    }
  }
  catch {
    Write-Host "设置 WSL 代理地址过程中出现错误,退出执行流程" -ForegroundColor Red
    Write-Host $_ -ForegroundColor Red
    Exit
  }
}将脚本函数添加到 PowerShell 配置文件中,这样下次就可以直接使用 Set-WSLProxy 命令了
# 不存在,就创建一个
notepad $profilevscode 警告信息
虽然上面设置了,打不开的地址也能访问了,但 vscode 还是存在警告提示,这就需要通过修改设置了
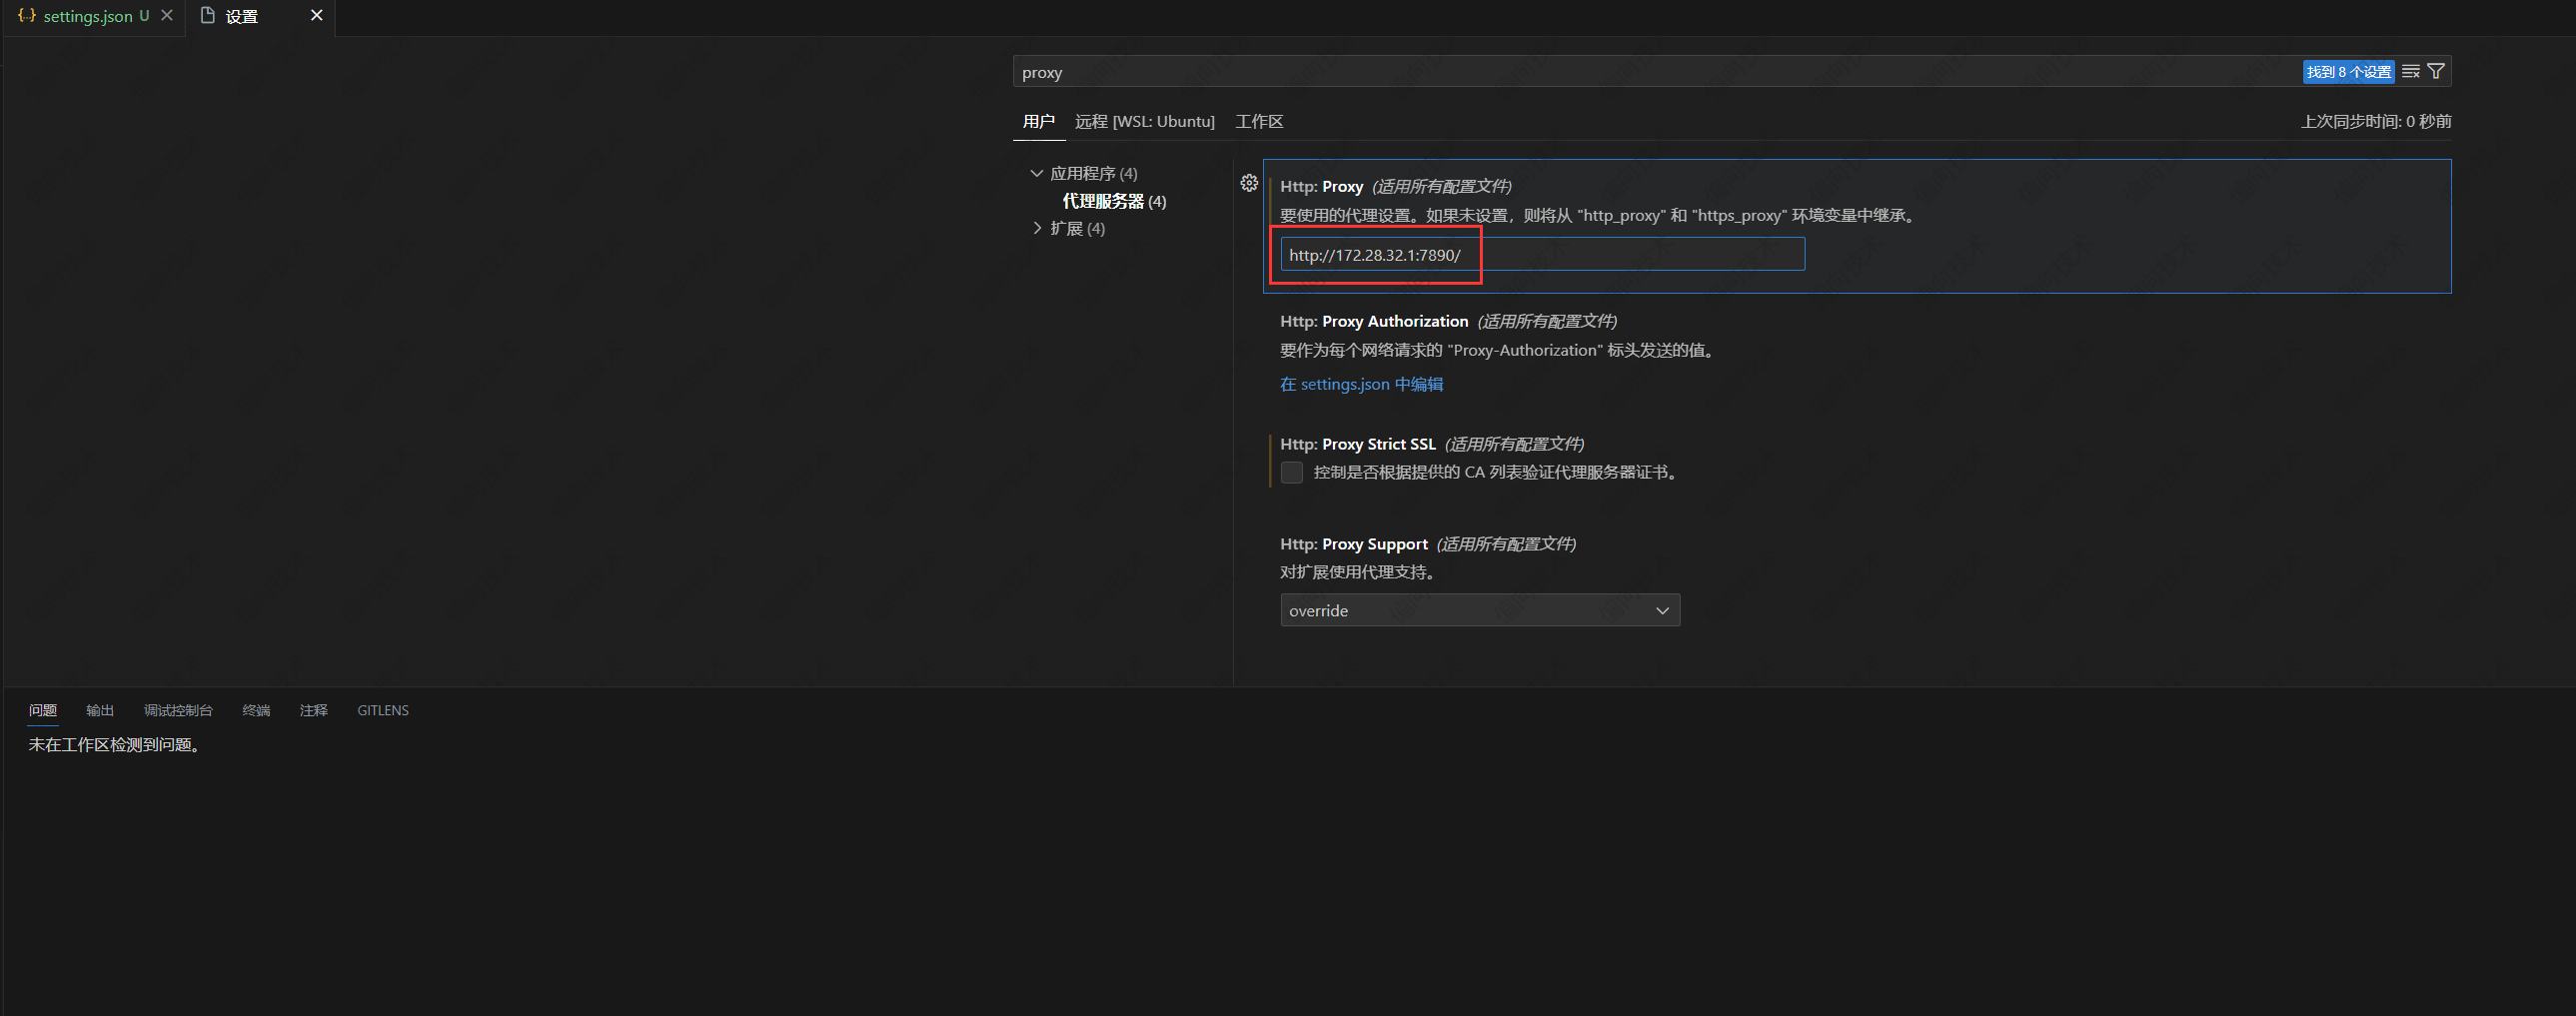
填入 proxy 之后,警告就消失了
结尾
虽然解决了问题,但如果哪天没有使用科学上网了,那么还是需要手动修改 vscode 代理设置和 shell 配置文件,一下子就好像不方便了
如果在 WSL 中执行的话,可能就找到 nameserver(Windows 中 WSL 的 IP 地址),知晓代理端口(一般不会换),在 shell 配置文件中导出一个环境变量 ALL_PROXY
评论 (0)